Table of Contents
I remember when I first heard about vermicomposting. I thought it sounded complicated. Worms in a bin inside my home? It felt strange at first. Then I learned how simple it really is.
In this guide, I will walk you step-by-step through vermicomposting. I will explain what it is, how to start, what tools you need, and how to use vermicompost for garden success. I will keep this clear, simple, and backed by trusted sources so you can feel confident starting today.
What Is Vermicomposting?
Vermicomposting is composting with worms. The worms eat food scraps and turn them into rich compost called worm castings.
According to the United States Environmental Protection Agency, composting with worms is an effective way to reduce food waste and create nutrient-rich soil amendments. That means it helps your garden grow while keeping waste out of landfills.
Worm composting is:
- Clean
- Low odor
- Easy to manage
- Great for small spaces
Why Vermicompost for Garden Use Is So Powerful
Vermicompost for garden beds improves soil in several ways.
Research from Cornell Waste Management Institute shows that vermicompost:
- Improves soil structure
- Increases water retention
- Boosts beneficial microbes
- Adds nutrients like nitrogen and phosphorus
When I add vermicompost to my garden, I see stronger roots and greener plants.
Step 1: Choose the Right Worms
The best worms for beginners are red wiggler worms for vermicomposting. Their scientific name is Eisenia fetida.
These worms:
- Live near the surface
- Eat food scraps
- Reproduce quickly
- Thrive in bins
Do not use garden earthworms. They need deep soil and will not survive in compost bins.
Step 2: Choose Your Vermicomposting Bins
Your container matters. Good vermicomposting bins have:
- Air holes
- Drainage
- A lid
- Shallow depth
You can buy ready-made vermicomposting bins or make your own from a plastic tote.
Indoor bins work great in:
- Kitchens
- Basements
- Garages
Outdoor bins need shade and protection from extreme weather.
Step 3: Decide on a Vermicompost Kit or DIY Setup
You can start with a vermicompost kit or build your own system.
A vermicompost kit often includes:
- Stackable trays
- Bedding
- Instructions
DIY setups cost less and work just as well.
I tell beginners to focus more on conditions than on equipment.
Must Read : Vermicomposting & Maintenance: How to Keep a Worm Bin Healthy Long-Term
Step 4: Prepare Bedding
Bedding is the worm’s home. It should be soft, moist, and airy.
Good bedding includes:
- Shredded newspaper
- Shredded cardboard
- Coconut coir
Soak bedding in water. Then squeeze it until it feels like a wrung-out sponge.
Fill your bin about 6–8 inches deep with bedding.
Step 5: Add the Worms
Place red wiggler worms for vermicomposting on top of the bedding.
Leave the lid off with a light on for a few minutes. Worms move away from light and will burrow down.
If they try to crawl out later, check moisture and airflow.
Step 6: Feed the Worms Properly
This step is where most beginners make mistakes.
Good foods:
- Vegetable scraps
- Fruit scraps in small amounts
- Coffee grounds
- Crushed eggshells
Avoid:
- Meat
- Dairy
- Oily food
- Large amounts of citrus
Bury food under bedding. Start small.
The United States Department of Agriculture explains that worms feed on decomposing organic matter and the microbes that grow on it. That is why small, chopped scraps work best.
Step 7: Maintain Proper Conditions
Worms like:
- Temperatures between 55°F and 80°F
- Moist bedding
- Air circulation
If the bin smells bad, it usually means overfeeding.
Add dry bedding and reduce food if needed.
How Long Until You Get Vermicompost?
Most beginner systems produce usable vermicompost in:
- 2 to 3 months
You will see dark, crumbly material that smells earthy.
That is finished worm compost.
How to Harvest Vermicompost
There are simple harvesting methods.
Method 1: Side Feeding
Push compost to one side. Add fresh bedding and food to the other side. Worms move toward the food.
Method 2: Light Method
Dump compost onto a tarp. Worms move away from light. Remove compost layer by layer.
Harvesting is easier than people think.
How to Use Vermicompost for Garden Success
Using vermicompost for garden beds is simple.
You can:
- Mix it into garden soil before planting
- Add a handful to planting holes
- Top-dress around plants
- Mix into potting soil
Studies from Penn State Extension show vermicompost improves plant growth due to beneficial microbes and plant growth hormones found in worm castings.
I usually mix 10–20% vermicompost into soil for best results.
Benefits of Vermicomposting
Here is why I recommend it:
- Reduces food waste
- Produces organic fertilizer
- Improves soil life
- Requires little space
- Saves money on soil products
The United States Environmental Protection Agency confirms composting reduces methane emissions in landfills. That means vermicomposting also helps the environment.
Common Beginner Mistakes
I see these often:
✗ Overfeeding
✗ Too much moisture
✗ Not enough air holes
✗ Using the wrong worms
Fixes are simple when caught early.
Indoor vs Outdoor Vermicomposting
Indoor systems:
- Stable temperature
- Less weather stress
- Easy monitoring
Outdoor systems:
- Larger capacity
- Need shade
- Need weather protection
Choose what fits your space.
Are Vermicomposting Bins Hard to Manage?
No. Once balanced, they require only:
- Weekly feeding
- Quick moisture check
- Occasional harvesting
It becomes routine quickly.
Is Vermicomposting Safe?
Yes. When done correctly, it is:
- Clean
- Low odor
- Safe for homes
Always wash hands after handling compost, just like gardening.
Final Thoughts
Vermicomposting is simple once you break it into steps. Start with red wiggler worms for vermicomposting. Use proper bedding. Feed small amounts. Keep moisture balanced.
The reward is rich vermicompost for garden use that improves soil naturally.
You do not need perfection. You need consistency.
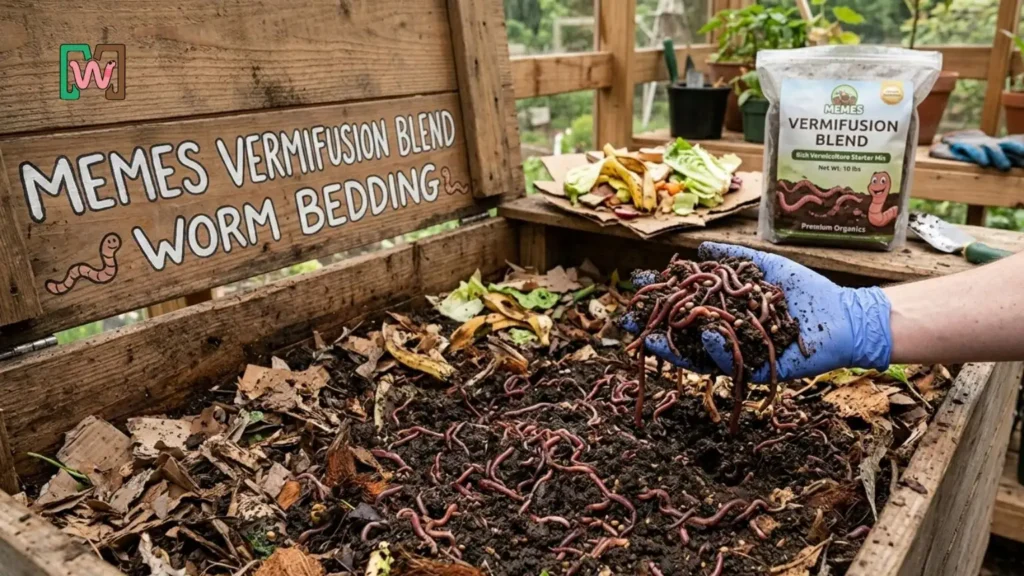
Memes VermiFusion Blend Worm Bedding
Meme’s VermiFusion Blend Worm Bedding is the ultimate bedding for worms, carefully crafted to create a cozy, nutrient-rich, and highly effective environment for your composting system. Whether you’re a beginner experimenting with your first worm bin or an advanced vermicomposter managing multiple bins, this premium worm bedding ensures your worms stay healthy, active, and highly productive.
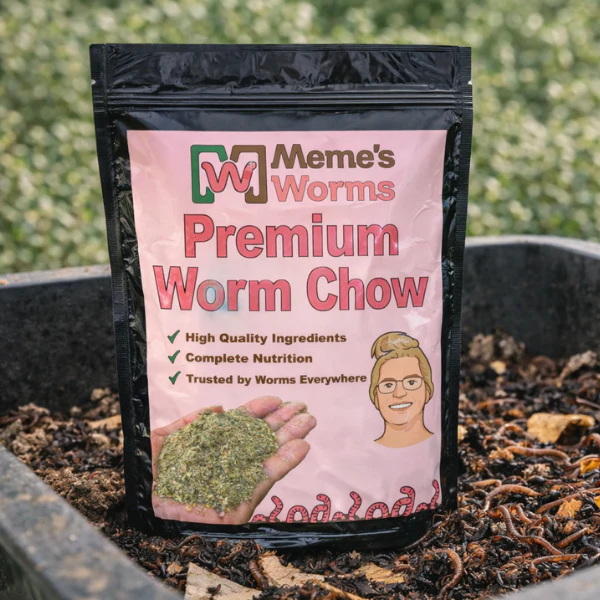
Meme's Premium Worm Chow For Sale
Meme’s Premium Worm Chow, made exclusively by Meme’s Worms, is a specially formulated feed designed to provide complete nutrition to your composting worms. A unique blend of grains, grasses, and high-potency additives helps your worms grow bigger, healthier, and more active. This balanced formula supports faster composting, improved worm health, and higher production of nutrient-rich worm castings.
Frequently Asked Questions
What are the best worms for vermicomposting?
Red wiggler worms for vermicomposting are the best choice for beginners.
How long does it take to make vermicompost?
Most systems produce compost in 2 to 3 months.
Can I use a vermicompost kit?
Yes. A vermicompost kit makes setup easy and beginner-friendly.
How much vermicompost should I use in my garden?
Mix 10–20% vermicompost into soil or add a handful to planting holes.
Do vermicomposting bins smell?
When managed properly, vermicomposting bins smell earthy, not rotten.

Samantha Flowers
Hi, I’m Samantha aka Meme, founder of Meme’s Worms, a commercial worm farm based in Valdosta, Georgia. I’m a hands-on worm farmer, educator, and business owner who has spent years raising, harvesting, and shipping Red Wigglers, European Nightcrawlers, and composting worms to gardeners, homesteaders, educators, and commercial growers across the United States. Everything I teach and write about here is based on real-world experience, not theory. View More